如果这篇博客帮助到你,可以请我喝一杯咖啡~
CC BY 4.0 (除特别声明或转载文章外)
二 pagecache
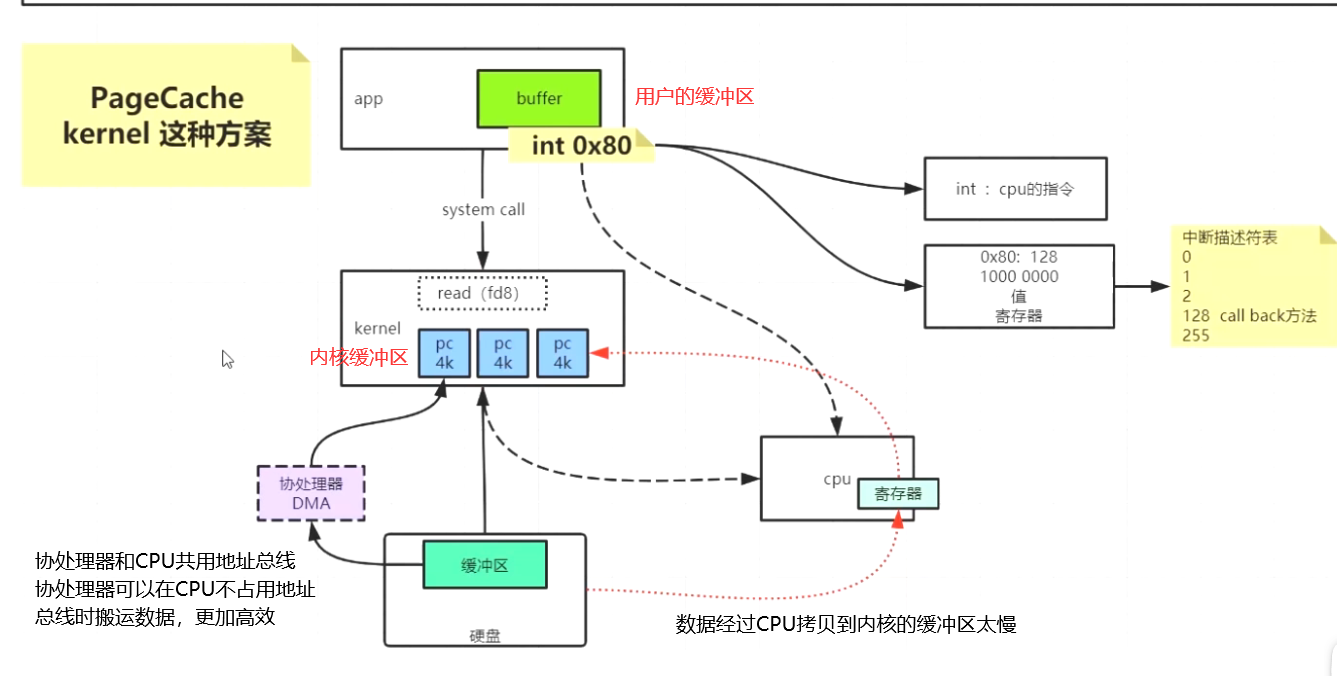
1、了解 pagecahe


pcstat 命令
这是一个 go 开发的查看文件有多少页被缓存进内存的程序。
安装参考:
- Centos7下Linux pcstat安装教程
- git - GnuTLS recv error (-110): The TLS connection was non-properly terminated - Stack Overflow
磁盘上的程序在执行时(如果程序文件很大)不会一次性全部拷贝到物理内存中去,也就是说对应进程的代码段(.txt)不会一次性包含磁盘上程序的全部代码。
使用 pcstat 命令查看 bash 程序有多少页拷贝进内存:
)
free 命令
dirty page 相关参数
查看参数:
❯ sysctl -a | grep dirty
vm.dirty_background_bytes = 0
vm.dirty_background_ratio = 10
vm.dirty_bytes = 0
vm.dirty_expire_centisecs = 3000
vm.dirty_ratio = 20
vm.dirty_writeback_centisecs = 500
vm.dirtytime_expire_seconds = 43200
参数说明:
vm.dirty_background_ratio = x:当 page cashe 的大小占用到可用内存的 $x\%$ 时,开启一个线程淘汰一些页(lru,可能存在在脏页写回磁盘)。vm.dirty_ratio = x:当进程使用的 page cashe 的大小占用到可用内存的 $x\%$ 时,阻塞当前进程,等待操作系统回收可用内存。vm.dirty_expire_centisecs = 3000与vm.dirty_writeback_centisecs = 500centisecs 为 百分之一秒。
修改参数:
❯ vim /etc/sysctl.conf
pmap
pmap $(pidof pm)
-x pid
❯ pmap -x $(pidof main)
105035:   ./main
Address           Kbytes     RSS   Dirty Mode  Mapping
0000557c16c31000       4       4       4 r---- main
0000557c16c32000       4       4       4 r-x-- main
0000557c16c33000       4       4       4 r---- main
0000557c16c34000       4       4       4 r---- main
0000557c16c35000       4       4       4 rw--- main
0000557c16d5c000     132       4       4 rw---   [ anon ]
00007facf1c39000     148     148       0 r---- libc-2.31.so
00007facf1c5e000    1504     768       0 r-x-- libc-2.31.so
00007facf1dd6000     296      64       0 r---- libc-2.31.so
00007facf1e20000       4       0       0 ----- libc-2.31.so
00007facf1e21000      12      12      12 r---- libc-2.31.so
00007facf1e24000      12      12      12 rw--- libc-2.31.so
00007facf1e27000      24      24      24 rw---   [ anon ]
00007facf1e42000       4       4       0 r---- ld-2.31.so
00007facf1e43000     140     140       0 r-x-- ld-2.31.so
00007facf1e66000      32      32       0 r---- ld-2.31.so
00007facf1e6f000       4       4       4 r---- ld-2.31.so
00007facf1e70000       4       4       4 rw--- ld-2.31.so
00007facf1e71000       4       4       4 rw---   [ anon ]
00007ffc648bb000     132      12      12 rw---   [ stack ]
00007ffc649c4000      12       0       0 r----   [ anon ]
00007ffc649c7000       4       4       0 r-x--   [ anon ]
ffffffffff600000       4       0       0 --x--   [ anon ]
---------------- ------- ------- -------
total kB            2492    1256      96
这个命令可以看到脏页的大小
-XX pid show me all

- How to Use the pmap Command on Linux (howtogeek.com)
- Easily Understand Your Linux RAM Usage With Smem (howtogeek.com)
更多关于 Page Cache
[Page Cache, the Affair Between Memory and Files Many But Finite](https://manybutfinite.com/post/page-cache-the-affair-between-memory-and-files/) - Page Cache and Page Cange Writeback
##
2、IO 方式对比
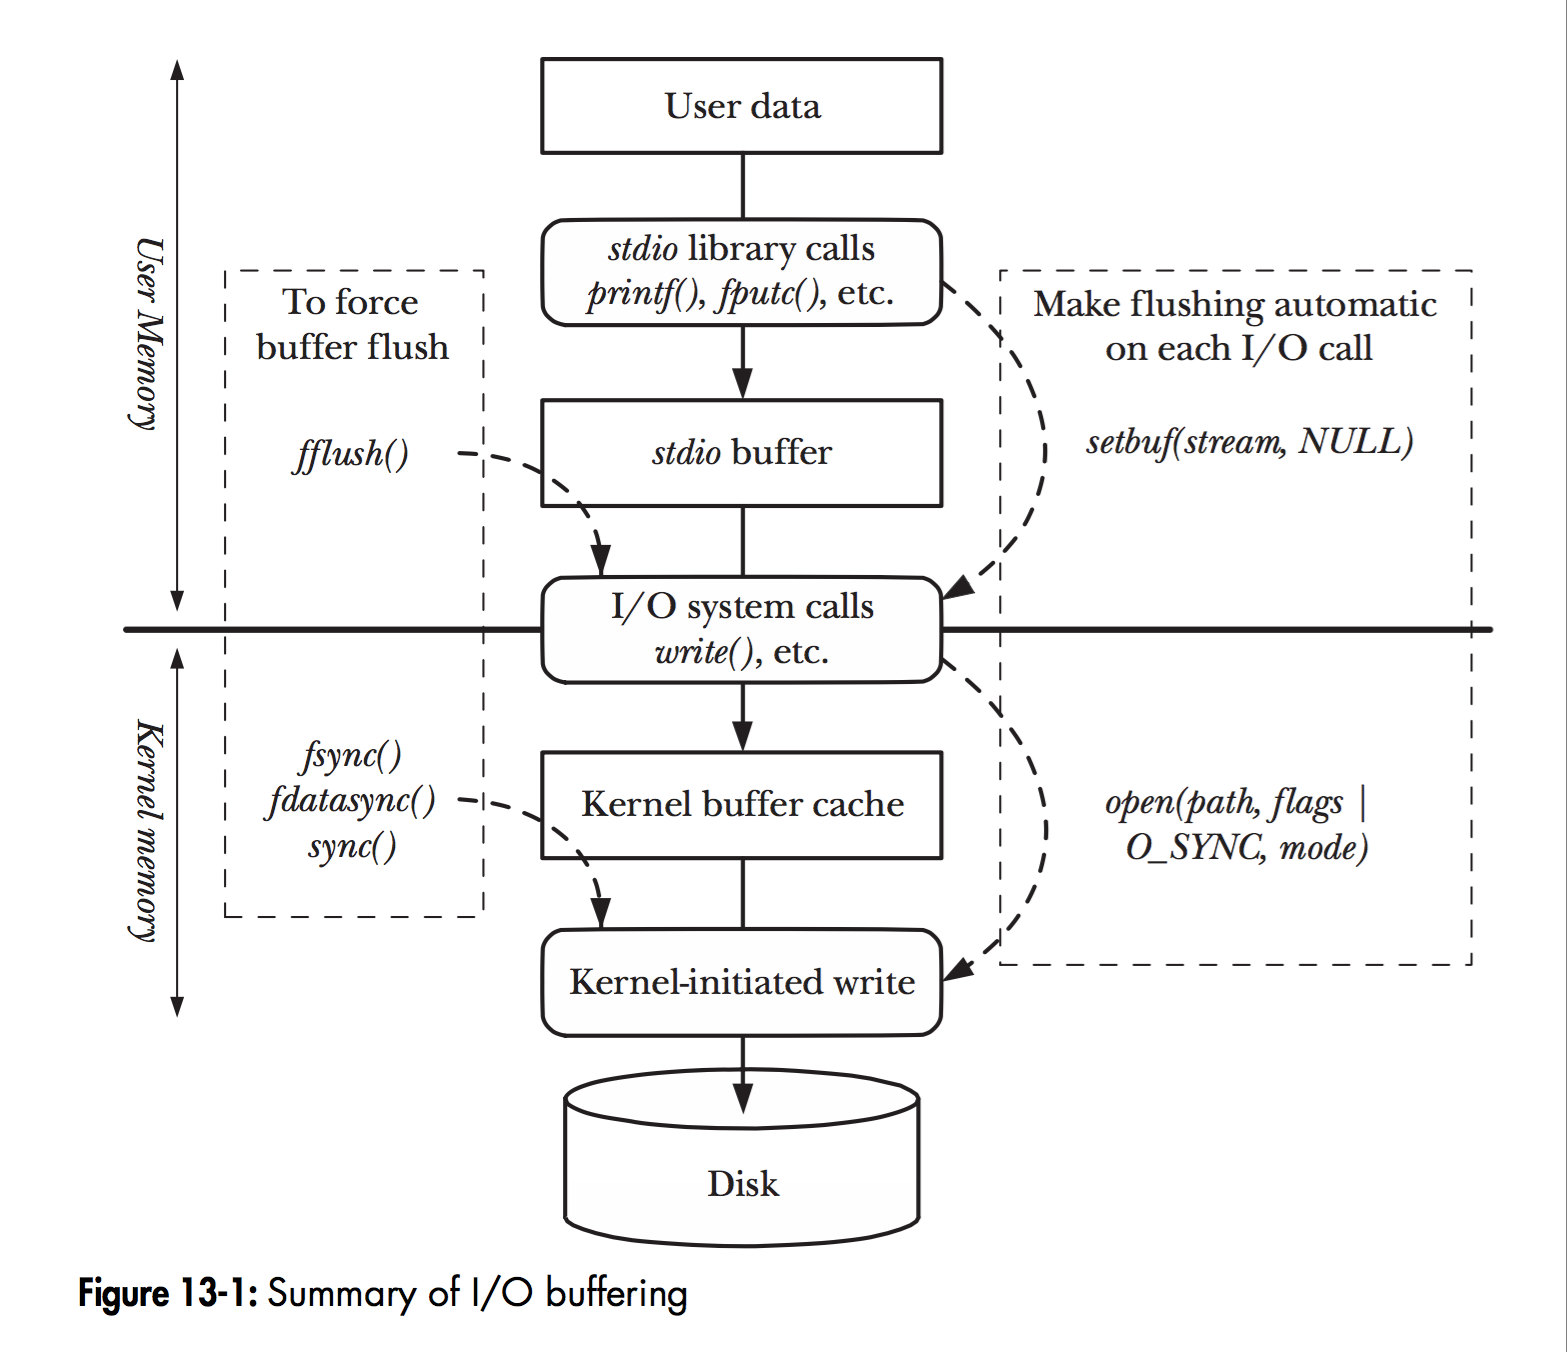
1)直接使用 read/write
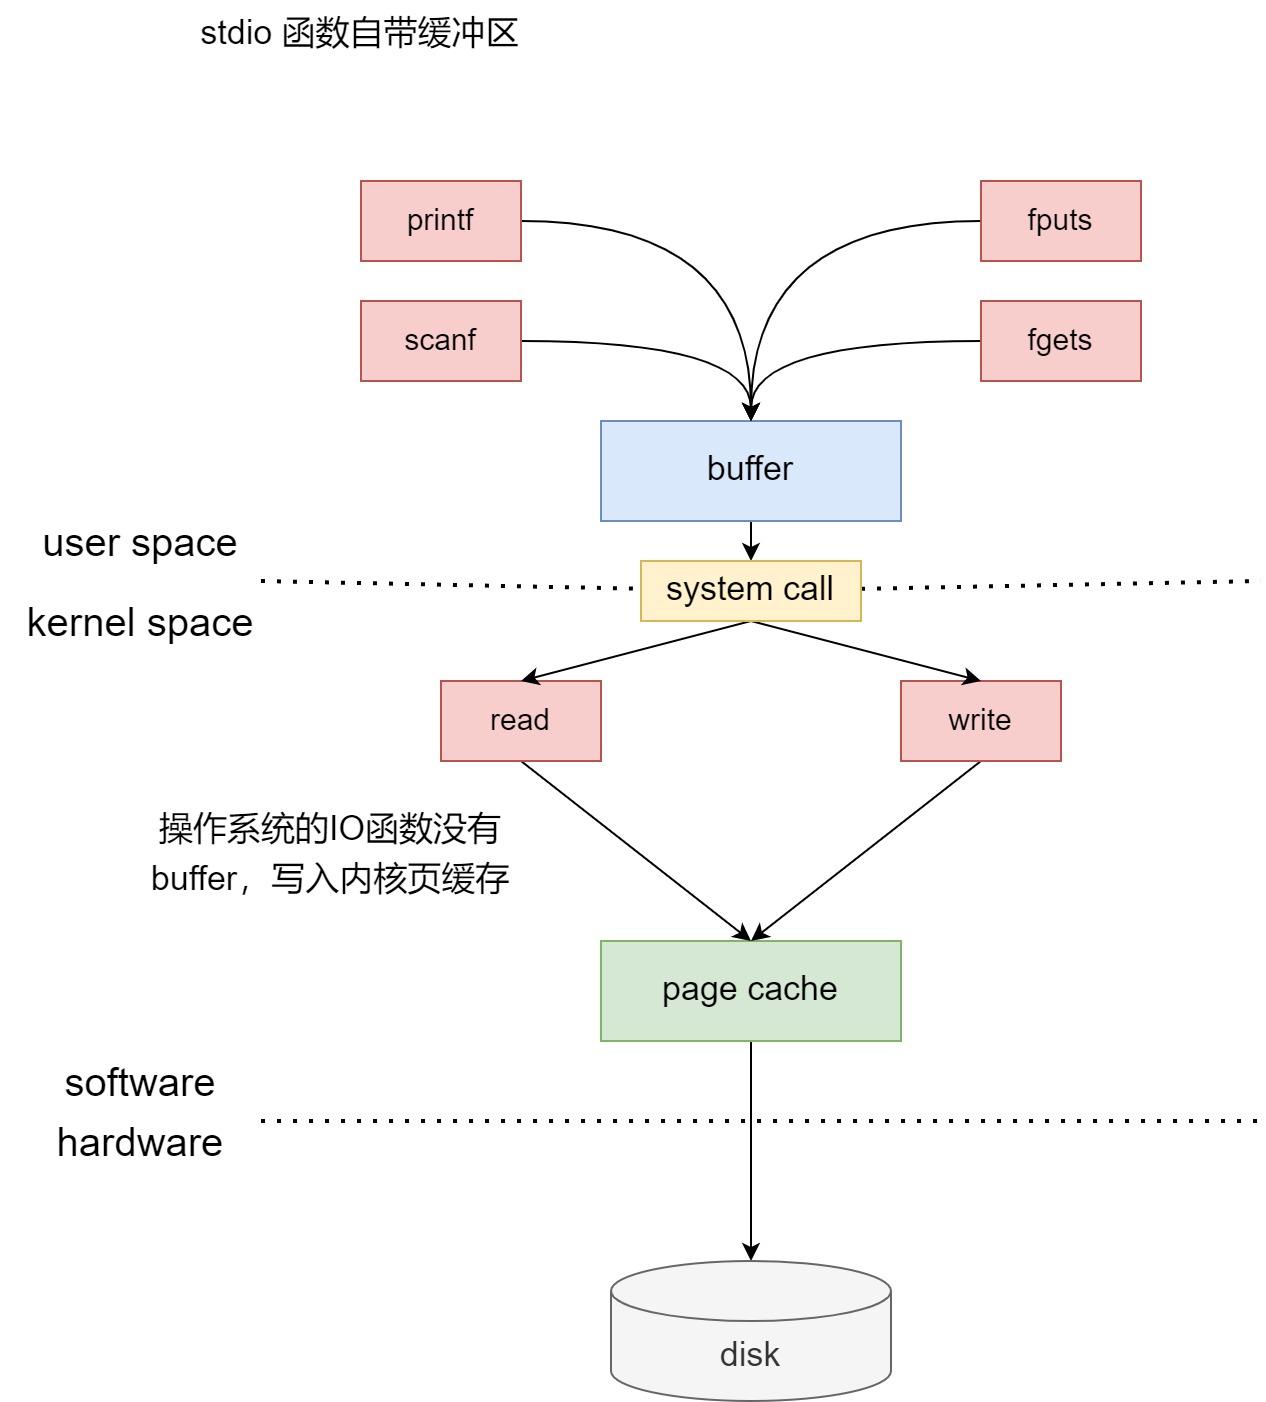
2)使用 mmap 直接使用内核 page cache
可以减少系统调用的次数,这是 java 的 MappedByteBuffer 的的实现。C 貌似没有相应的接口,但是这种思路我觉得很好
int * arr = new int[len]; //len is larger than the largest int from the data
fill_n(arr, len, -1);  //fill with -1
long loadFromIndex = 0;
struct stat sizeResults;
long size;
if (stat(fileSrc, &sizeResults) == 0) {
    size = sizeResults.st_size; //here size would be ~551950000 for 552M test file
}
mmapFile = (char *)mmap(NULL, size, PROT_READ, MAP_SHARED, fd, pageNum*pageSize);
long offset = loadFromIndex % pageSize;
while (offset < size) {
    int i = htonl(*((int *)(mmapFile + offset)));
    offset += sizeof(int);
    int j = htonl(*((int *)(mmapFile + offset)));
    offset += sizeof(int);
    swapElem(i, j, arr);
}
return arr;
3)Direct IO
)
由于是直接读写文件,没有使用内核 page cache,其他进程无法共享文件的缓存。
Direct I/O is a feature of the file system whereby file reads and writes go directly from the applications to the storage device, bypassing the operating system read and write caches. Direct I/O is used only by applications (such as databases) that manage their own caches.
在 open 文件时加上
O_DIRECT标志,这样以通告内核我们想对该文件进行 直接 io 操作。在源文件的最顶端加上
_GNU_SOURCE宏定义,或在编译时加在命令行上也可以。存放文件数据的缓存区起始位置以及每一次读写数据长度必须是磁盘逻辑块大小的整数倍,一般也就是512字节(也有可能是一内存页大小,4096),否则将导致read/write失败,perror将提示:read failed: Invalid argument或write failed: Invalid argument。 1和2很容易做到,而第3点,要满足缓存区起始位置与512对齐,这可以在进行缓存区空间申请时使用posix_memalign这样的函数指定512对齐:
int ret = posix_memalign((void **)&buf, 512, BUF_SIZE);或者进行手动调节对齐:
real_buf = malloc(BUF_SIZE + 512);
aligned_buf = ((((unsigned int)real_buf + 512 - 1) / 512) * 512);
/**
 * gcc direct_io_read_file.c -o direct_io_read_file -D_GNU_SOURCE
 */
#include <stdio.h>
#include <stdlib.h>
#include <unistd.h>
#include <sys/file.h>
#include <sys/types.h>
#include <sys/stat.h>
#include <string.h>
#define BUF_SIZE 1024

int main()
{
    int fd;
    int ret;
    unsigned char *buf;
    ret = posix_memalign((void **)&buf, 512, BUF_SIZE);
    if (ret) {
        perror("posix_memalign failed");
        exit(1);
    }

    fd = open("./direct_io.data", O_RDONLY | O_DIRECT, 0755);
    if (fd < 0){
        perror("open ./direct_io.data failed");
        exit(1);
    }

    do {
        ret = read(fd, buf, BUF_SIZE);
        if (ret < 0) {
            perror("write ./direct_io.data failed");
        }
    } while (ret > 0);

    free(buf);
    close(fd);
}
[4.9. Direct I/O Red Hat Enterprise Linux 5 Red Hat Customer Portal](https://access.redhat.com/documentation/en-us/red_hat_enterprise_linux/5/html/global_file_system/s1-manage-direct-io) - Linux direct io
4)java 的几种 IO 方式
)
5)使用带缓存的 fopen
见下一节 C 的 IO
三 linux 系统 IO
0、进程对文件描述符的管理
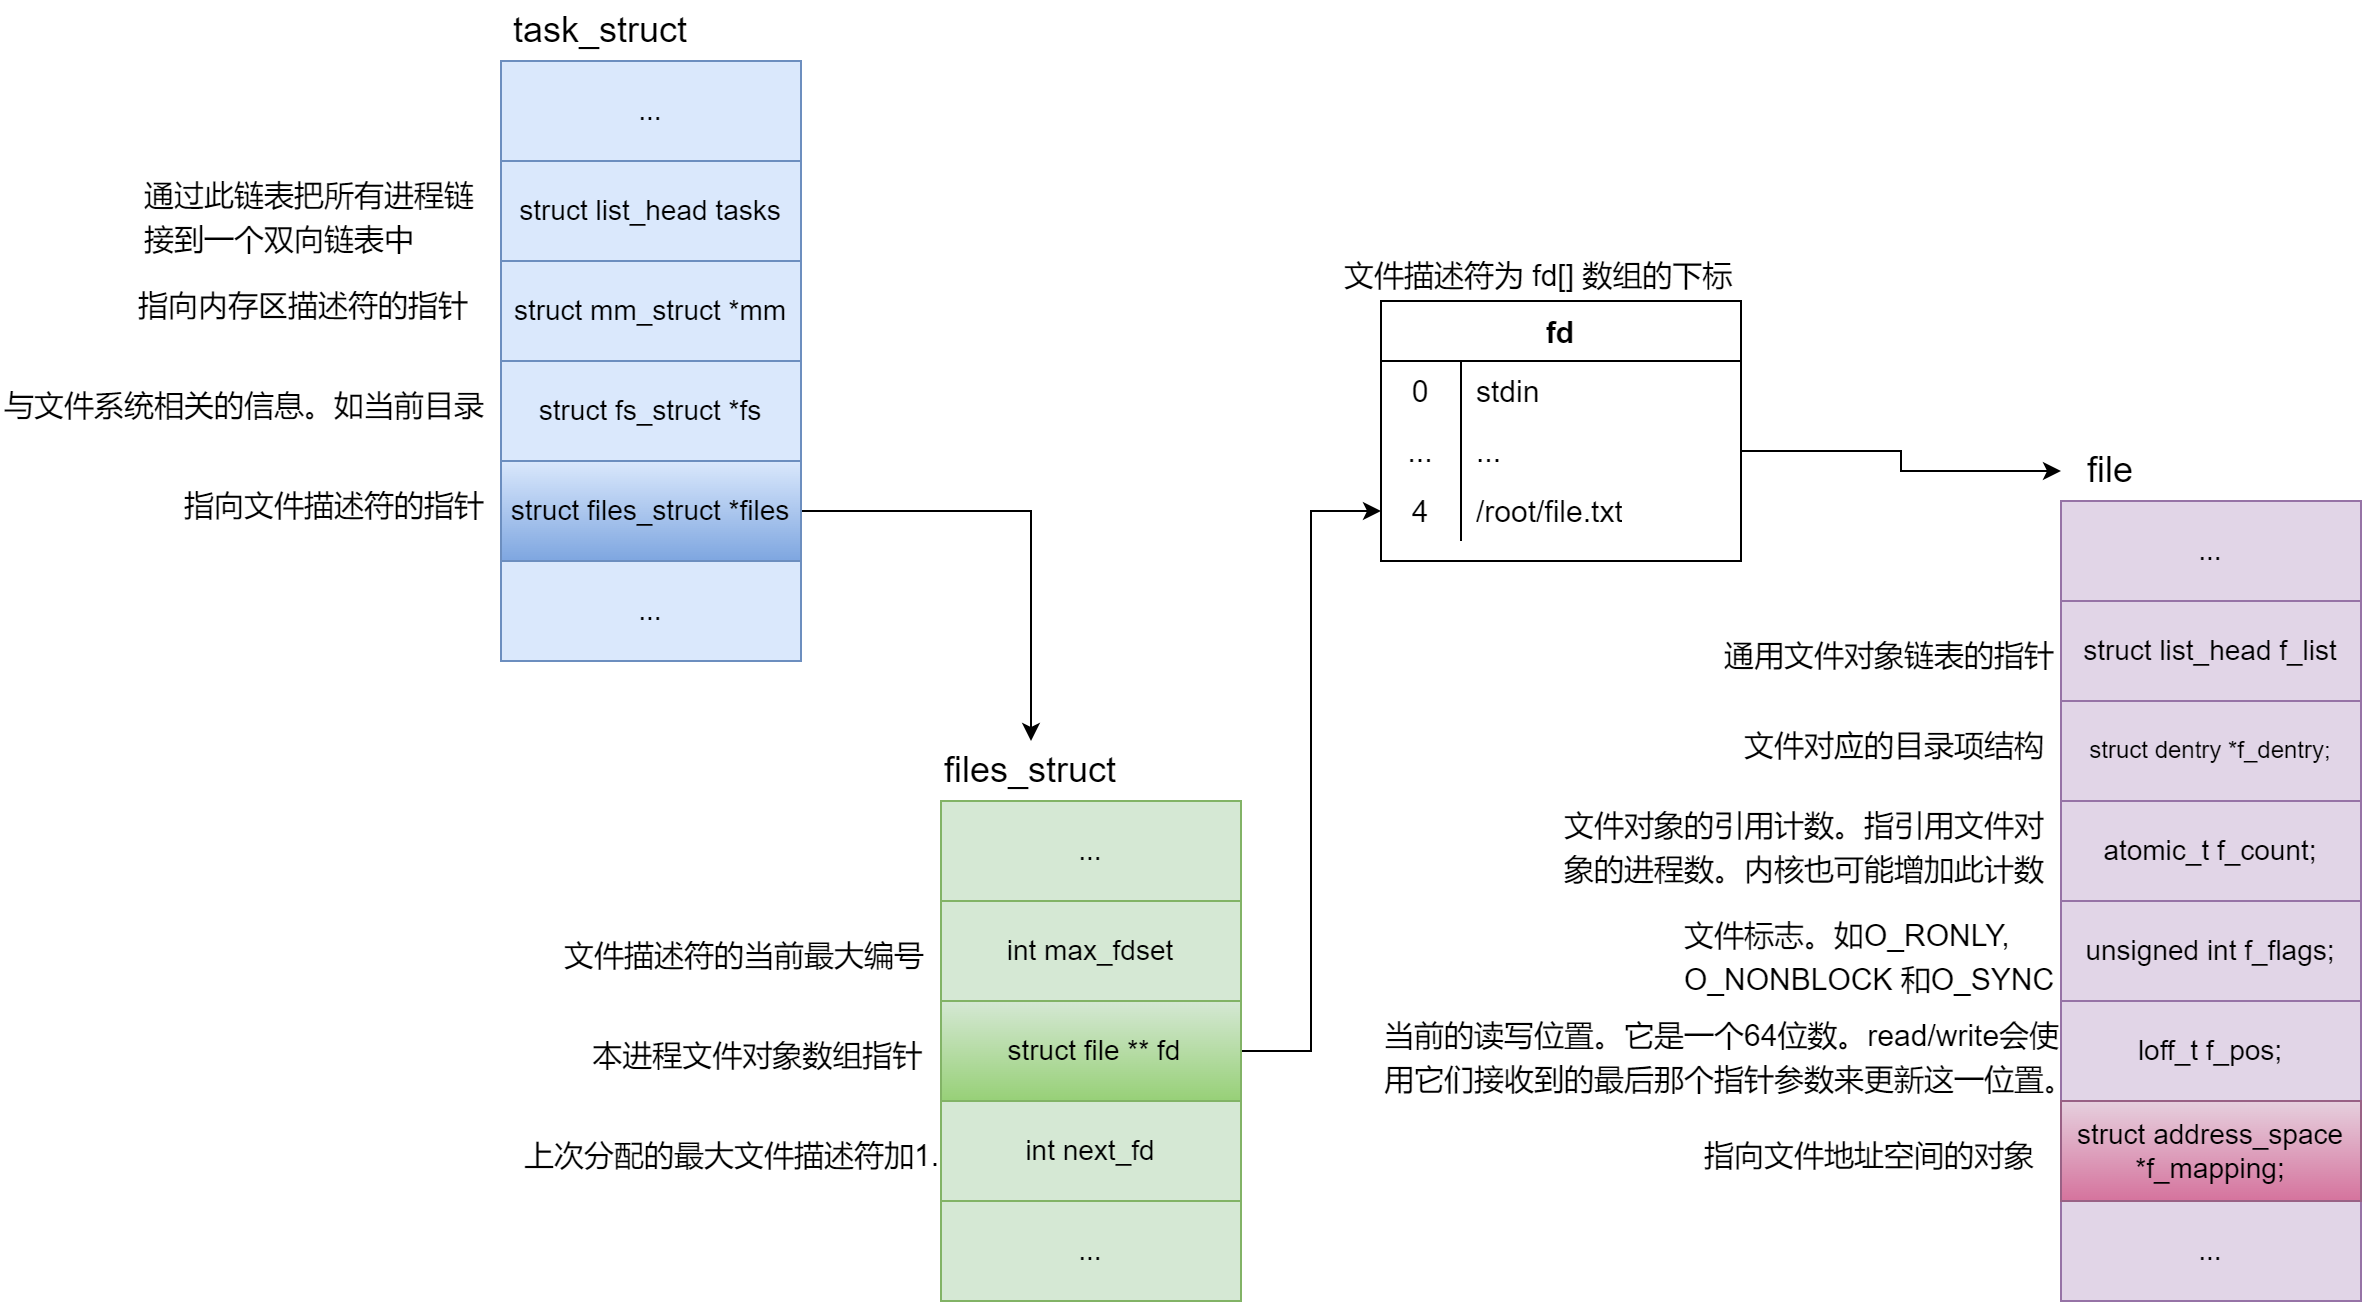
父子进程会共享 file ,文件描述符表项
int main()
{
	int fd = open("new_file", O_RDONLY);

	char buf[1024];
	if( fork() == 0)
	{
		read(fd, buf, 10);
		write(1, buf, 10);
	}
	else
	{
		read(fd, buf, 10);
		write(1, buf, 10);
	}

	return 0;
}
cat new_file
write1
line 2
line 3
line 4
line 5
❯ gcc main.c -o main
❯ ./main
write1
line 2
line 3#
1、cwd 的概念
current work directory 当前工作目录
进程的 cwd 并不是该进程对应的可执行程序所在的路径,而是进程创建时所在的路径。
mian.c 程序如下
#define PRINT_ERR(x) { perror(x), exit(EXIT_FAILURE); }

int main()
{
	int fd = open("new_file", O_RDWR|O_CREAT);
	if(fd == -1) PRINT_ERR("open");
	getchar();
	close(fd);

	return 0;
}
❯ pwd
/root

❯ ./main &
[1] 177120
[1]  + 177120 suspended (tty input)  ./main

❯ ll /proc/$(pidof main)
total 0
...
lrwxrwxrwx  1 root root 0 May 20 10:03 cwd -> /root
lrwxrwxrwx  1 root root 0 May 20 10:03 exe -> /root/main
...
可执行程序 main 所在的目录为 /root ,当我们在 /root 目录下运行程序时,进程的 cwd 就是 /root 。
❯ ls
dou  hard_main.c  main  main.c  new_file  soft_main.c  source-git  test  tool  work
new_file 被创建在当前目录下
❯ cd /

❯ ./root/main&
[1] 177437
[1]  + 177437 suspended (tty input)  ./root/main
❯ ll /proc/$(pidof main)
total 0
...
lrwxrwxrwx  1 root root 0 May 20 10:21 cwd -> /
lrwxrwxrwx  1 root root 0 May 20 10:21 exe -> /root/main
...

❯ ls
bin   dev  GOPATH  lib    lib64   lost+found    new_file  ...
进入 / 目录,再次运行 /root 目录下的 main,发现此时 main 进程的 cwd 变为 /,同时文件生成在了 / 目录下。
2、open
open 是原子操作。
#include <sys/types.h> #include <sys/stat.h> #include <fcntl.h>
int open(const char *pathname, int flags); int open(const char *pathname, int flags, mode_t mode)Parameter:
flag 定义打开方式:
O_RDONLY 只读
O_WRONLY 只写
- O_RDWR 读写
- O_CREAT 若文件不存在将创建 一个新文件
- O_TRUNC 如文件已经存在 , 且是一个普通文件 ,打开模式又是可写就把 文件长度设置为零 , 丢弃其中的现有内容
- O_EXCL 通过 O_CREAT, 生成 文件 , 若文件已经存在 , 则 open 出错 , 调用失败
- O_APPEND 文件以追加模式打开
Return value
失败返回 -1;成功,返回整数,代表被打开的文件,是文件描述符(句柄 handler)
文件描述符个数:
$ ulimit -a
输入上面的命令,我们可以看到一行:
open files (-n) 1024
其实我们最多能打开的文件只有 1021 个(1024 - 3),stdin,stdout,stderr 三个文件默认打开。
ulimit 命令查看的是当前进程的信息
如何查看系统最多能打开的文件数呢?
cat /proc/sys/fs/file-max
系统能打开的文件总数受物理内存大小的影响。
文件描述符分配规则
从 3 开始按顺序分配,如果关闭了之前打开的文件描述符,下次分配从最小的未分配的文件描述符开始分配。比如将 0 号文件描述符关闭,下次分配的文件描述符就为 0
3、 read
#include <unistd.h>
ssize_t read(int fd, void *buf, size_t count);Return value
- -1 出错
- 0 文件读完
程序:输出文件内容
#include<unistd.h>
#include<stdio.h>
#include<fcntl.h>
#include<stdlib.h>
#include<string.h>

#define BUFSIZE 10

int main(void){

  int fd = open("test_open.c", O_RDONLY);
  if(fd == -1) perror("open"),exit(EXIT_FAILURE);

  char buf[BUFSIZE + 1];

  while(1){
    memset(buf, 0x00, sizeof(buf));
    // 一定要把 buf 中的全部元素初始化为 \0
    // 原因有二:
    // 1.后面输出时使用 %s 输出的,如果没有 \0 会发生越界访问
    // 2.最用一次从文件中读入时,可能没有填满 buf ,这样调用 %s 时就是未定义的

    int r = read(fd, buf, 10);
    if(r == -1) perror("read"),exit(EXIT_FAILURE);

    if(r == 0){
      printf("\n读取完成\n");
      break;
    }

    printf("%s", buf);

  }

  if( close(fd) == -1 ) perror("close"),exit(EXIT_FAILURE);

  return 0;
}
你是否有办法可以一个单词一个单词的打印出来
// 这个程序功能并不完善,仅供参考

#include<unistd.h>
#include<stdio.h>
#include<fcntl.h>
#include<stdlib.h>
#include<string.h>
#include<ctype.h>

#define BUFSIZE 100
#define IN 1
#define OUT 0

void read_word(char buf[], int bufsize){

  int i, flg = OUT;

  for(i = 0; i < bufsize;){
    // 单词入口
    if(flg == OUT && (isalnum( buf[i]) || buf[i] == '_')){
      flg = IN;
      putchar(buf[i]);
      i++;
    }
    // 读入单词的字母到缓冲区
    else if(flg == IN && (isalnum(buf[i]) || buf[i] == '_')){
      putchar(buf[i]);
      i++;
    }
    // 单词出口
    else if(flg == IN && (!isalnum(buf[i]) && buf[i] != '_')){
      flg = OUT;
      fflush(stdout);
      usleep(500000);
    }
    // 其他字符一个一个打印
    else{
      putchar(buf[i]);
      fflush(stdout);
      usleep(500000);
      i++;
    }
  }
}


int main(void){

  int fd = open("test_open.c", O_RDONLY);
  if(fd == -1) perror("open"),exit(EXIT_FAILURE);

  char buf[BUFSIZE];
  memset(buf, 0x00, sizeof(buf));

  while(1){
    int r = read(fd, buf, BUFSIZE);
    if(r == -1) perror("read"),exit(EXIT_FAILURE);

    if(r == 0){
      printf("\n读取完成\n");
      break;
    }

    read_word(buf, BUFSIZE);
  }

  if( close(fd) == -1 ) perror("close"),exit(EXIT_FAILURE);

  return 0;
}
4、write
#include <unistd.h>
ssize_t write(int fd, const void *buf, size_t count);Description
write 向文件描述符 fd 所引用的文件中写入从 buf 开始的缓冲区中 count 字节的数据
Return value
成功时返回所写入的字节数(若为零则表示没有写入数据). 错误时返回-1,并置errno为相应值. 若count为零,对于普通文件无任何影响,但对特殊文件将产生不可预料的后果.
程序:实现 cp 的复制文件功能
一般我们使用 cp 命令复制文件时,会这样使用:
cp src dst
.
#include<unistd.h>
#include<fcntl.h>
#include<stdio.h>
#include<stdlib.h>
#include<string.h>
#include<errno.h>

int main(int argc, char* argv[]){

  if(argc != 3){
    fprintf(stderr, "%s usage: src dst\n", argv[0]);
    exit(EXIT_FAILURE);
  }

  int src_fd = open(argv[1], O_RDONLY);
  // 打开文件失败
  if(src_fd == -1){
    fprintf(stderr, "open %s failed: %s \n", argv[1], strerror(errno));
    exit(EXIT_FAILURE);
  }

  int dst_fd = open(argv[2], O_WRONLY|O_CREAT, 0644);
  // O_CREAT 表示如果文件不存在,则创建一个新文件
  if(dst_fd == -1){
    close(src_fd);// 关闭打开的 src 文件
    fprintf(stderr, "open %s failed: %s \n", argv[2], strerror(errno));
    exit(EXIT_FAILURE);
  }

  char buf[1024];

  while(1){
    memset(buf, 0x00, 1024);

    int num_read = read(src_fd, buf, 1024);
    //读失败
    if(num_read == -1){
      fprintf(stderr, "read failed: %s\n", strerror(errno));
      exit(EXIT_FAILURE);
    }
    if(num_read == 0)
      break; //读完文件

    int num_write = write(dst_fd, buf, num_read);
    //写失败
    if(num_write == -1){
      fprintf(stderr, "write failed: %s\n", strerror(errno));
      exit(EXIT_FAILURE);
    }

  }

  close(src_fd);
  close(dst_fd);
  return 0;
}
如果目标文件 dst 已经存在且有内容,src 并不会 覆盖 dst 的全部内容,只会覆盖 dst 文件中前 src 文件字节数的字节。
如果想要覆盖 dst 文件,在打开 dst 文件时需要加上 O_TRUNC选项
int dst_fd = open(argv[2], O_WRONLY|O_CREAT|O_TRUNC, 0644);
5、lseek
#include <sys/types.h> #include <unistd.h>
off_t lseek(int fd, off_t offset, int whence);whence 选项
SEEK_SET 文件首 The offset is set to offset bytes.
SEEK_CUR 现在的位置 The offset is set to its current location plus offset bytes.
SEEK_END 文件尾 The offset is set to the size of the file plus offset bytes.
offset
正数向后,负数向前
Return value
Upon successful completion, lseek() returns the resulting offset location as measured in bytes from the beginning of the file. On error, the value (off_t) -1 is returned and errno is set to indicate the error.
如何以追加的方式向文件写?
lseek(fd, 0, SEEK_END); // 将文件指针定位在文件尾
程序:文件随机读取
#include<unistd.h>
#include<fcntl.h>
#include<stdio.h>
#include<stdlib.h>

typedef struct Student{
  int id;
  char name[20];
}Stu;

void input(int fd, int n){

  Stu student;
  int i = 0;

  while(n-- > 0){
    student.id = i++;
    scanf("%s", student.name);
    if( write(fd, &student,sizeof(Stu)) == -1) perror("write failed."), exit(EXIT_FAILURE); // 写入 Stu 大小的内容
  }
}

void output(int fd, int n){

  int no;

  do{
  printf("查看第几名学生的信息:");
  scanf("%d", &no);
  }while(!(no <= n && no > 0)); // 输入的学生数应该比 0 大 比 学生总人数小

  Stu buf;

  lseek(fd, sizeof(Stu) * (no - 1), SEEK_SET);
  if( read(fd, &buf, sizeof(Stu)) == -1 ) perror("read failed."), exit(EXIT_FAILURE);// 向 read 传入 buf的地址,不要忘了 &
  printf("ID: %d name: %s\n", buf.id, buf.name);
}


int main(void){

  int fd = open("Student", O_RDWR|O_CREAT|O_APPEND, 0644);
  if(fd == -1) perror("open failed."), exit(EXIT_FAILURE);

  int n;

  printf("请输入学生数:");
  scanf("%d", &n);

  input(fd, n);
  output(fd, n);

  close(fd);
  if(fd == -1) perror("close failed."), exit(EXIT_FAILURE);

  return 0;
}
6、dup & dup2
除了 fork 子进程外,dup 函数也可以使引用计数增加
int dup(int oldfd);
#include <unistd.h>These system calls create a copy of the file descriptor oldfd.
有时候我们会把程序的输出不显示到屏幕上(stdout),而是重定向到一个文件中;或者使用echo "123" >file。这是如何实现的呢?
我们知道标准输出的 fd 为 1 。而 dup 创建的新的 fd 为最小的(从 0 开始)那个没有使用的数:
int fd = open("output.txt", O_RWONLY);
close(1); // 关闭标准输出
dup(fd); // 1 号 fd 指向 output.txt
之后该程序的输出就会输出到这个 1 号 fd 指示的文件中了。
7、fcntl
#include <unistd.h> #include <fcntl.h>
int fcntl(int fd, int cmd, ... /* arg */ );fcntl - manipulate file descriptor
File descriptor flags
F_GETFD (void) Read the file descriptor flags; arg is ignored.
F_SETFD (int) Set the file descriptor flags to the value specified by arg.
File status flags
F_GETFL (void) Get the file access mode and the file status flags; arg is ignored.
F_SETFL (int) Set the file status flags to the value specified by arg. File access mode (O_RDONLY, O_WRONLY, O_RDWR) and file creation flags(i.e., O_CREAT, O_EXCL, O_NOCTTY, O_TRUNC) in arg are ignored.
On Linux this command can change only the O_APPEND, O_ASYNC,O_DIRECT, O_NOATIME, and O_NONBLOCK flags.
Advisory locking
F_GETLK, F_SETLK and F_SETLKW are used to acquire, release, and test for the existence of record locks
struct flock { … short l_type; /Type of lock: F_RDLCK,F_WRLCK, F_UNLCK / short l_whence; /How to interpret l_start:SEEK_SET, SEEK_CUR, SEEK_END / off_t l_start; /Starting offset for lock / off_t l_len; /Number of bytes to lock / pid_t l_pid; /PID of process blocking our lock (F_GETLK only) / … };
short l_type:
F_RDLCK : 读锁,共享锁。多个进程可以同时读取;但是在一个进程写的时候,其他进程不能读
F_WRLCK : 写锁, 排他锁。只要有一个进程上锁,其他进程无法打开文件
F_UNLCK : 解锁
1. 删除文件描述符
FD_CLOEXEC
使用 exec 系列函数替换进程时,默认新的进程可以使用被替换的进程打开的文件描述符。为了避免这种情况,可以在调用 exec 前调用 fntl 函数。下面的例子演示了如何在替换进程前关闭 fd 为 1 的文件描述符。
fcntl(1, F_SETFD, FD_CLOEXEC);
execlp("./ttt", "./ttt", NULL);
ttt 是由 ttt.c 编译来的可执行程序。 ttt.c 中有一条 printf 语句。运行上面的程序,没有任何输出(标准输出 1 被关闭)。
比如原进程 打开了一个文件,文件描述符是 4,然后调用 fcntl 关闭该文件,再调用 execlp。如果你在进程被替换后使用 lsof -p 命令会发现 4 号文件没有了。
注意:fcntl 不会在当前进程中关闭该文件。你可以在 fcntl 后加一条 printf 语句,看看会不会写出到标准输出。
2. 设置文件非阻塞
O_NONBLOCK : 设置为非阻塞(有内容直接读,没有则跳过)
#include<unistd.h>
#include<stdio.h>
#include<stdlib.h>
#include<fcntl.h>

int main(void){

  char buf[1024] = {};
  int flg = fcntl(0, F_GETFL);

  fcntl(0, F_SETFL, flg|O_NONBLOCK); //O_NONBLOCK 设置为非阻塞

  int r = read(0, buf, sizeof(buf));
  if(r == -1) perror("read"), exit(EXIT_FAILURE);

  printf("buf = [%s]\n", buf);

  return 0;
}
输出:
read: Resource temporarily unavailable
为了读入内容,而键盘输入又过于慢,我们可以使用输入重定向:
$ ./a.out <file
8、 stat
stat 函数可以显示文件部分元数据(metadata) ,比如 ls -l 显示的信息。文件的元数据存放在结构体 inode 中。
` #include <sys/types.h>
#include <sys/stat.h>#include` ` int stat(const char *pathname, struct stat *buf);`
  The stat structure
       All of these system calls return a stat structure, which contains the following fields:
struct stat {
    dev_t     st_dev;         /* ID of device containing file */ 设备编号
    ino_t     st_ino;         /* inode number */
    mode_t    st_mode;        /* file type and mode */ 权限
    nlink_t   st_nlink;       /* number of hard links */
    uid_t     st_uid;         /* user ID of owner */
    gid_t     st_gid;         /* group ID of owner */
    dev_t     st_rdev;        /* device ID (if special file) */
    off_t     st_size;        /* total size, in bytes */ 文件大小
    blksize_t st_blksize;     /* blocksize for filesystem I/O */
    blkcnt_t  st_blocks;      /* number of 512B blocks allocated */

    /* Since Linux 2.6, the kernel supports nanosecond
    precision for the following timestamp fields.
    For the details before Linux 2.6, see NOTES. */

    struct timespec st_atim;  /* time of last access */  最后一次被访问时间
    struct timespec st_mtim;  /* time of last modification */ 最后一次修改时间
    struct timespec st_ctim;  /* time of last status change */ 文件元数据被改时间

    #define st_atime st_atim.tv_sec      /* Backward compatibility */
    #define st_mtime st_mtim.tv_sec
    #define st_ctime st_ctim.tv_sec
};
Because tests of the above form are common, additional macros are defined by POSIX  to allow the test of the file type in st_mode to be written more concisely:

S_ISREG(m)  is it a regular file?

S_ISDIR(m)  directory?

S_ISCHR(m)  character device?

S_ISBLK(m)  block device?

S_ISFIFO(m) FIFO (named pipe)?

S_ISLNK(m)  symbolic link?  (Not in POSIX.1-1996.)

S_ISSOCK(m) socket?  (Not in POSIX.1-1996.)

The preceding code snippet could thus be rewritten as:

stat(pathname, &sb);
if (S_ISREG(sb.st_mode)) {
    /* Handle regular file */
}
0. struct stat 和 struct inode 的区别
下面是 inode 结构体:
struct inode {
	/**
	 * 通过此字段将对象放入哈希表。
	 */
	struct hlist_node	i_hash;
	/**
	 * 通过此字段将队列链入不同状态的链表中。
	 */
	struct list_head	i_list;
	/**
	 * 通过此字段将其链入到超级块的inode链表中。
	 */
	struct list_head	i_sb_list;
	/**
	 * 引用索引节点的目录项对象链表头。
	 */
	struct list_head	i_dentry;
	/**
	 * 索引节点编号。
	 */
	unsigned long		i_ino;
	/**
	 * 引用计数器。
	 */
	atomic_t		i_count;
	/**
	 * 文件类型与访问权限。
	 */
	umode_t			i_mode;
	/**
	 * 硬链接数目。
	 */
	unsigned int		i_nlink;
	/**
	 * 所有者ID
	 */
	uid_t			i_uid;
	/**
	 * 所有者组标识符。
	 */
	gid_t			i_gid;
    /**
	 * 对表示设备文件的inode结构,该字段包含了真正的设备编号。
	 */
	dev_t			i_rdev;
	/**
	 * 文件的字节数。
	 */
	loff_t			i_size;
	/**
	 * 上次访问文件的时间。
	 */
	struct timespec		i_atime;
	/**
	 * 上次与文件的时间。
	 */
	struct timespec		i_mtime;
	/**
	 * 上次修改索引节点的时间。
	 */
	struct timespec		i_ctime;
	/**
	 * 块的位数。
	 */
	unsigned int		i_blkbits;
	/**
	 * 块的字节数。
	 */
	unsigned long		i_blksize;
	/**
	 * 版本号,每次使用后递增。
	 */
	unsigned long		i_version;
	/**
	 * 文件的块数。
	 */
	unsigned long		i_blocks;
	/**
	 * 文件最后一个块的字节数。
	 */
	unsigned short          i_bytes;
	/**
	 * 非0表示文件是一个套接字。
	 */
	unsigned char		i_sock;
	/**
	 * 保护索引节点某些字段的自旋锁。
	 */
	spinlock_t		i_lock;	/* i_blocks, i_bytes, maybe i_size */
	/**
	 * 保护索引节点的信号量。
	 */
	struct semaphore	i_sem;
	/**
	 * 在直接IO文件操作中避免出现竞争条件的读写信号量。
	 */
	struct rw_semaphore	i_alloc_sem;
	/**
	 * 索引节点的操作。
	 */
	struct inode_operations	*i_op;
	/**
	 * 缺省文件操作。
	 */
	struct file_operations	*i_fop;	/* former ->i_op->default_file_ops */
	/**
	 * inode所在的超级块。
	 */
	struct super_block	*i_sb;
	/**
	 * 文件锁链表,通过此字段将文件上的所有锁链接成一个单链表。
	 */
	struct file_lock	*i_flock;
	/**
	 * 指向address_space对象的指针。
	 */
	struct address_space	*i_mapping;
	/**
	 * 文件的address_space对象。
	 */
	struct address_space	i_data;
#ifdef CONFIG_QUOTA
	/**
	 * 索引节点的磁盘限额。
	 */
	struct dquot		*i_dquot[MAXQUOTAS];
#endif
	/* These three should probably be a union */
	/**
	 * 用于具体的字符或块设备的索引节点链表指针。
	 */
	struct list_head	i_devices;
	/**
	 * 如果内核是一个管道则非0
	 */
	struct pipe_inode_info	*i_pipe;
	/**
	 * 指向块设备驱动程序的指针。
	 */
	struct block_device	*i_bdev;
	/**
	 * 表示字符设备的内部数据结构。当inode指向一个字符设备文件时,该字段包含了指向struct cdev结构的指针。
	 */
	struct cdev		*i_cdev;
	/**
	 * 次设备号索引。
	 */
	int			i_cindex;

	/**
	 * 索引节点版本号。由某些文件系统使用。
	 */
	__u32			i_generation;

#ifdef CONFIG_DNOTIFY
	/**
	 * 目录通知事件掩码。
	 */
	unsigned long		i_dnotify_mask; /* Directory notify events */
	/**
	 * 用于目录通知。
	 */
	struct dnotify_struct	*i_dnotify; /* for directory notifications */
#endif

	/**
	 * 索引节点状态标志。
	 */
	unsigned long		i_state;
	/**
	 * 索引节点弄脏的时间,以jiffies为单位。
	 */
	unsigned long		dirtied_when;	/* jiffies of first dirtying */

	/**
	 * 文件系统的安装标志。
	 */
	unsigned int		i_flags;

	/**
	 * 用于写进程的引用计数。
	 */
	atomic_t		i_writecount;
	/**
	 * 索引节点安全结构。
	 */
	void			*i_security;
	/**
	 * 文件系统私有数据指针。
	 */
	union {
		void		*generic_ip;
	} u;
#ifdef __NEED_I_SIZE_ORDERED
	/**
	 * SMP系统为i_size字段获取一致性时使用的顺序计数器。
	 */
	seqcount_t		i_size_seqcount;
#endif
};
1. 设备编号
st_dev 高 8 位存储的是主设备号,低八位存储的是次设备号
程序演示:
#include<unistd.h>
#include<sys/stat.h>
#include<stdio.h>
#include<stdlib.h>

int main(void){

  struct stat state;
  stat("test_st_dev.c", &state);

  printf("主设备号:%hhu\n", (state.st_dev >> 8) & 0xFF);// 右移八位获取高八位,按位与 0xFF(256)
  printf("次设备号:%hhu\n", state.st_dev & 0xFF);

  return 0;
}
运行结果:
[dev@localhost 04]$ ./a.out
主设备号:253
次设备号:0
我们来验证一下该文件在系统中的设备号和我们打印的是否相同:

2. 文件类型和权限
类型:
The following mask values are defined for the file type of the st_mode field:

S_IFMT     0170000   bit mask for the file type bit field

S_IFSOCK   0140000   socket
S_IFLNK    0120000   symbolic link
S_IFREG    0100000   regular file
S_IFBLK    0060000   block device
S_IFDIR    0040000   directory
S_IFCHR    0020000   character device
S_IFIFO    0010000   FIFO

Thus, to test for a regular file (for example), one could write:

stat(pathname, &sb);
if ((sb.st_mode & S_IFMT) == S_IFREG) {
/* Handle regular file */
}

权限:
The following mask values are defined for the file mode component of the st_mode field:

S_ISUID     04000   set-user-ID bit
S_ISGID     02000   set-group-ID bit (see below)
S_ISVTX     01000   sticky bit (see below)

S_IRWXU     00700   owner has read, write, and execute permission
S_IRUSR     00400   owner has read permission
S_IWUSR     00200   owner has write permission
S_IXUSR     00100   owner has execute permission

S_IRWXG     00070   group has read, write, and execute permission
S_IRGRP     00040   group has read permission
S_IWGRP     00020   group has write permission
S_IXGRP     00010   group has execute permission

S_IRWXO     00007   others  (not  in group) have read, write, and
execute permission
S_IROTH     00004   others have read permission
S_IWOTH     00002   others have write permission
S_IXOTH     00001   others have execute permission
其他
进程 ID 查询
ps -ef | grep "可执行程序名称"pidof 可执行程序名称
